Hope Reflected

Encouragement and Hope from God's Word

Gardening Archive

Tuesday

5

July 2016

5 Inspiring Outdoor Fire Pits to Add to Your Back Yard

Written by , Posted in Gardening

With Summer in full swing, we’re spending as much time outdoors as possible. One thing on the horizon is a fire pit, if ever we can find the time! We’re big fans of natural stone, so planning our fire pit does not involve any kind of pre-fab “kit”. Rather, we’re considering a dry lay, similar to the dry lay stone bench that Wes has been working on. Check out my Outdoor Living board on Pinterest for more fire pit inspiration, and in the meantime, these are 5 amazing fire pits that have really got me feeling inspired!

1. Fire Pit by the water. I’m not a huge fan of pea gravel, but I do love the set up of this fire pit. The sectioned-off area creates definite separation from the grass, and I absolutely love the dry lay of the actual fire pit. Accented with some fantastic colonial red chairs and log side tables, this fire pit is sure to be a spot for making memories.

fire pit

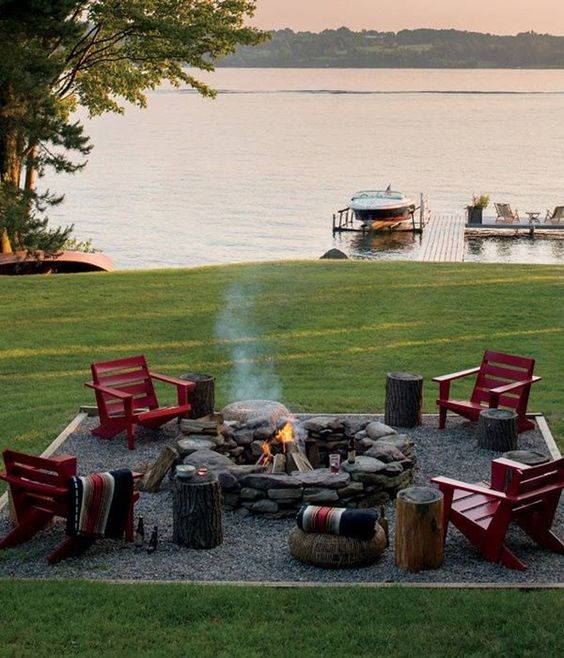
img via Fieldstone Hill Design Darlene Weir

2. Fire pit and bench. Outdoor seating doesn’t always have to be done with chairs, so it makes complete sense that this fire pit has a complementary surround in the same style. Again, I’m not a huge fan of gravel, but in this situation it works.
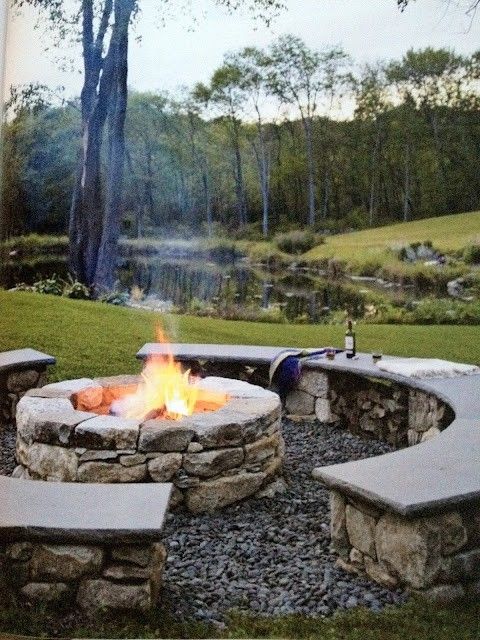
fire pit

img via indulgy.com

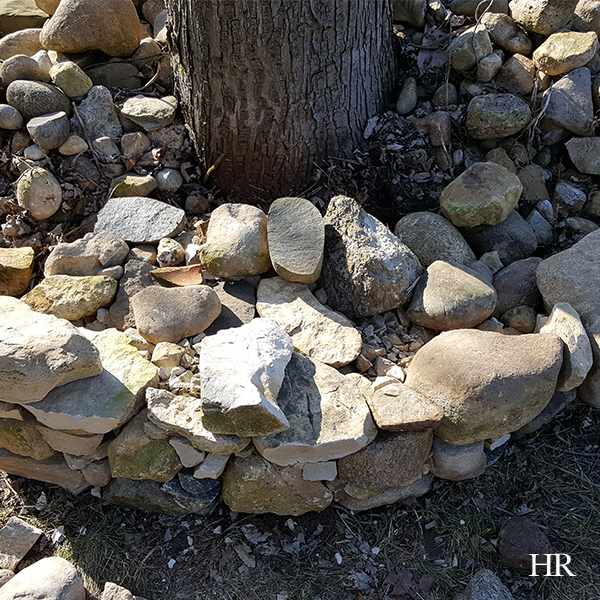
3. Dry lay fire pit. This fire pit is amazing! Check out the intricate details that went into this fire pit. It features some detailed arches and bottom vents to keep air flowing and fire glowing. Absolutely love this set up, and I think it would look great with a flagstone surround.

fire pit

img via Jessica Little House Big Heart

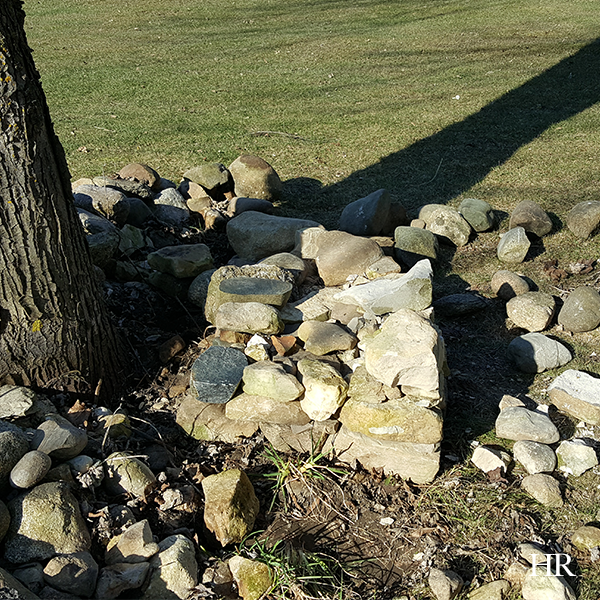
4. Flat and flush fire pit. While I’m more a fan of a fire pit that really stands out, I also appreciate the simplicity of this fire pit, which lays almost flush with the interlocking stone surround. There’s something to be said of this circular set-up, and I especially like that it’s at the end of a walk out with one stone step. Complementary landscaping around finishes the look and adds privacy.

fire pit

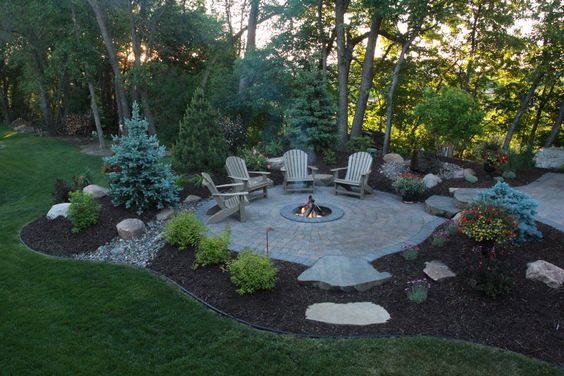
img via sunlitspaces.com

5. Built in fire pit. Speaking of privacy, this fire pit is actually built into a stone wall surround with some serious foliage behind. For a property on the road or bordering another home, this set up would be ideal. The stone wall surround means extra seating, and the open front of this fire pit provides plenty of heat.

fire pit

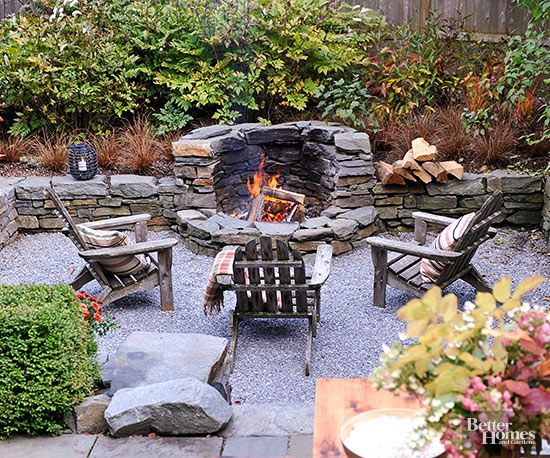
img via Better Homes and Gardens
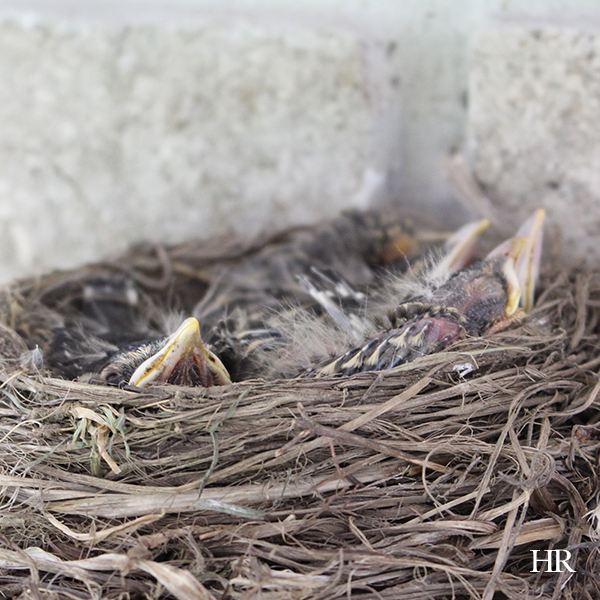
 

Friday

17

June 2016

Hope’s How-To: Build a Robin’s Nest – Part 4 – Robin Fledglings

Written by , Posted in Christian Living, Gardening, Hope's How-To

robin fledgling 1

This happened several weeks ago, however lately our lives have been in a constant state of motion, so I’ve not had time to post a robin update until now. The baby robins flew the coup (quite literally)! All four of our baby robin fledglings have left the nest and set out on their journey through… our yard.

baby robin fledgling in nest

Wes and I came home from church a few weeks ago, and I wanted to check on the baby robin fledglings in the nest. As the robins had been living right on our patio by our living area, it was easy to sit out and observe their growth, feedings,  and daily habits. Wes had encouraged me since the robin eggs hatched to keep my distance, and of course this particular Sunday in May I just had to get out there to see them.

Obviously the little guys were developed to the point that they were actually crowding the nest, however when I came out to see them, without being too close, they all fledged from the nest.

At first, I panicked. Wes ran around the yard and rounded them up to put back in the nest (see photo above), however it was clear; the baby robin fledglings were ready to embark on their adventure away from the nest.

baby robin fledglings

Over the past few weeks, a common sight in our yard has been Mama Robin bouncing and flying around the yard, with her young not far behind. While the robin fledglings have grown so much since the time of these photos almost a month ago, what remains of the family still calls our yard and trees home.

Unfortunately, we did lose one of the three robin fledglings — we aren’t sure if a cat got the robin, or the cold — however, three of the young survived (to our knowledge).

baby robin fledglings

While many of our friends and family still have robin fledglings in the nest, our robins have flown the coup! Before they were developed, it was so funny to watch them try to take flight with small wings and no tail. Clearly they’ve grown in the last few weeks, and we’ll try to capture more photos as we go.

Watching the baby robin fledglings in our yard has certainly been an education; when they’re young, robins are defenceless. They’re yet to learn how to fly (we were blessed enough to watch them practice in our yard), they’re dependant on their parents (Dad brings the young to the robin roost at night, while Mama Robin feeds the fledglings by day), and they’re testing their vocal chords (hearing robin fledglings start to exercise their vocal chords is one of the most adorable sounds).

Hint to those who’ve built a robin’s nesting shelf: When your first “family” leaves the nest, be sure to dispose of the robin’s nest, clean and spray off the area. Once abandoned for their real world adventure, robins don’t return to the nest where they were birthed. The old nest can attract lice and mites, so it’s best practice to dispose of it once the robins leave the nest for good.


Tuesday

7

June 2016

Dry Lay Stone Bench, Part 2

Written by , Posted in Gardening

dry lay stone bench

It’s been a while since we provided an update on the DIY dry lay stone bench that Wes has been working on. [Side note: Please excuse the weeds; it’s a work in progress, folks!] Last weekend, Wes was able to bring the project even further along, and we’re at a point now where we’ve got to decide how we’ll cap the bench.

dry lay stone bench

Our initial idea was to pour a concrete cap, however after some discussion and observation, — the wildlife in our yard seems to enjoy landing on the stone bench and using it as a favourite vantage point, — we’re actually considering planting some grass or moss on top of our stone bench.

dry lay stone bench

Wes’s methodology behind using an earthy substance is that by growing grass on top, the grass will eventually go to seed and grow a new lawn base around the bench. If we plant moss, it would make an attractive and distinguished cushion for the top of our DIY dry lay stone bench.

dry lay stone bench

We’ve decided that this bench may only be for occasional human use, and more for the natural world to enjoy.

What are your thoughts? We’ve looked at a few European examples, which lend more to our latter idea. Would you cap our stone bench with concrete, grass, or moss?


Thursday

19

May 2016

Hope’s How-To: Build a Robin’s Nest – Part 3 – Baby Robins Are Here

Written by , Posted in Christian Living, Gardening, Hope's How-To

mama robin feeding baby robins

They’re here!

While Wes and I were away, looks like Mama Robin had plenty of time to sit on her eggs! Four sweet baby robins have entered in to the world and are being raised on our patio. Wes has had to remind me several times to give the new family space—especially since the temperatures have been so cold—however today I was able to capture some photos of our tenants.

mama robin feeding baby robins

Mama and Papa Robin have pretty much taken over our property, and even pulling up the drive I can see them bouncing around on the lawn, giving me their most threatening glances. Fortunately, yesterday evening, I was able to get some photos of mama robin feeding her baby robins.

mama robin feeding baby robins

It is quite a phenomenon, watching robins feed their young. Robins are an altricial species, meaning that their young are hatched or born in an undeveloped state that requires care and feeding by the parents. Unlike chicks who hatch in a more mature state, baby robins aren’t the best looking birds of the bunch (although admittedly I do find them quite adorable).

mama robin feeding baby robins

Most baby robins have very few or no feathers, bulging eyes, and almost transparent skin. It is truly a miracle of creation to see these little birds up close, and also to observe the parent robins feeding their young.

mama robin feeding baby robins

Interestingly enough, robins start feeding at sunrise, and often Mama and Papa robins feed their young about every twenty minutes from sunrise to sunset. Their diet consists mostly of worms and berries.

mama robin feeding baby robins

Typically it takes baby robins two weeks (likely 9 to 16 days) to be fledged before they fly from the nest, and you can usually tell once baby robins are a week old as the parent robin(s) stop sleeping in the nest around that time.

mama robin feeding baby robins

Another important thing to remember about robins is that the parent robins go by sight and sound, not by smell. This means, that unlike other animals with young, if you discover a baby robin that has fallen from the nest, you can gently pick it up and place it back in the nest without the Mama and Papa robins abandoning the fledglings.

mama robin feeding baby robins

“Look at the birds of the air….” {Matthew 6:26}


Wednesday

27

April 2016

Hope’s How-To: Build A Robin’s Nest – Part 2 – The Robin’s Eggs

Written by , Posted in Christian Living, Gardening, Hope's How-To

robin's eggs

Robin’s nest update for you all: The robin has laid two — count it, TWO — eggs! Yes, that’s right! Robin’s eggs! Yesterday afternoon, I noted whilst driving away from the house that the mama robin was in the nest. Sure enough, last night when we checked, you can imagine my delight upon the discovery of two beautiful robin’s egg blue robin’s eggs.

My initial exclamation was something about how exciting this promise of new life is; Wes’s initial exclamation was about the future of the robin species. The robin deciding to lay her eggs is a beautiful example of a delicate, fragile new beginning, right on our porch. Whatever way you choose to look at it, we are  absolutely thrilled with the prospect of two baby robins starting their lives and learning the ropes from the comfort of our porch.

robin's egg - hope's how-to build a robin's shelf

We are being careful not to be disruptive while the mama robin incubates and raises her young [although I have to say in hindsight I wish we’d set up a time lapse camera to capture all the action; note to self for next year].

Here are some fascinating facts about robins and their eggs:

  1. The incubation period for a robin’s egg is 12 to 14 days.
  2. The female robin typically does the incubating, rarely leaving her eggs for more than 5 to 10 minutes at a time.
  3. After birth, baby robins spend an average of 9 to 16 days in the nest.

Stay tuned for more action as we keep an eye on the mama robin and her young. Anyone else have robins planting roots in their yard this year?

Monday

25

April 2016

Flower Container and Planter Inspiration

Written by , Posted in Gardening

I think it’s safe to say that Spring has sprung, and that means people everywhere are readying their yards and porches for the agreeable weather ahead. If you’re looking for front porch inspiration, check out these flower container and planter ideas. There are so many beautiful planter combinations out there!

  1. Bright Potato Vineflower container and planter ideaWith any planter, a good rule of thumb is to include some plants with height, and others that hang and add interest. Enter the vivid green potato vine. Easy to combine with almost any other flower, potato vine adds contrast in this planter.

2. Rainbow of Colour

flower container and planter idea

While sometimes it’s cool to keep colours classic (think whites and greens), filling a container with flowers of several shades is like an instant encouragement! The pops of purple, yellow, and red in this planter are so bright! And remember, a great container garden has height as well as hang — and this planter is a perfect example.

3. Cabbage!

flower planter and container idea

While this container is more suitable for the cooler fall months, I’ve gotta say, I’m LOVING the colourful cabbage and ornamental kale in this planter! Add to that the white pumpkins, and you’ve got a container that’s as interesting as it is beautiful.

4. Unlikely Flowersflower container and planter idea

If you’re like me, when planning a flower container garden, tulips aren’t the first flower that comes to mind as a good candidate. That being said, I’m loving the look of these planters, filled with lots of seasonal favourites, including several varieties of tulips. These containers are also a great example of the rule of threes: Try combining three planters of varying heights, filled with complementary flowers.

For more flower container and planter inspiration, visit my Pinterest.

Monday

18

April 2016

Dry Lay Stone Bench, Part 1

Written by , Posted in Gardening, Hope's How-To

apr18_dryrubblelaystonewall2

I’m pretty excited about the latest DIY project at our house: A stone bench. Being married to a master stone mason is a big blessing! This past weekend, Wes started to tackle the large stones we have surrounding one of the trees on our property. They were originally part of a tree well, and now these stones are being used to make a very attractive (and practical) dry lay stone bench (or two).

dry lay stone bench

On Saturday, Wes started the project, and began selecting and striking the stones. Eventually, his dry lay will form a bench, and he’ll pour a cap on the top to create the bench part.

Creating a dry lay formation of any kind — whether it’s a bench, a wall, or even a foundation — requires the mason or enthusiast to constantly keep a cool head and maintain a lot of patience.

This DIY dry lay stone bench project is in the very early stages, and I’ll post further updates as we move ahead. Wes’s plan right now is to create two benches, one that faces east, and one that faces west.

dry lay stone bench


Monday

11

April 2016

Tulips

Written by , Posted in Gardening

A couple of years ago, I purchased some tulip bulbs, which sat in my kitchen through the winter, until one day when my Mum was visiting, she planted them. Last Spring, when the tulips bloomed, they were the most vibrant red.

Those same tulips in our garden started to sprout up with the warm weather we had a few weeks back. Wes and I both intended to cover them, however — as frequently happens in life — things of more importance took precedence.  Since then, we’ve had sleet, snow, ice, rain, more snow, and as a result we’ve been questioning whether or not the tulips will bloom when Spring finally makes an appearance.

red tulips bouquet

Being the incredible man that he is, Wes brings me home flowers every Friday. This past Friday, he picked up the most beautiful, fresh tulips from Elora St. Flowers — and they’re red, just like the ones in our garden. *sigh* I’ve been enjoying these beauties the past few days, and I have to say, they make me eager for warmer days and to see our outdoor flowers!

Like robins, tulips are a sure sign of Spring. Part of the lily family, tulip flowers come in a wide array of colours, and there are more than 3,000 varieties of the flower. You may associate tulips with Holland, and rightfully so, however tulips are thought to have originated in Central Asia.

red tulip flowers

While the tulips in our garden are midseason bloomers (late April/early May), you can purchase tulips that bloom as early as March and as late as mid-May. These attractive flowers offer a lot of vibrance for very little maintenance.

On a more important note, April is Parkinson’s Awareness Month, and the tulip is the symbol of hope for a cure.

red tulip flowers

Wednesday

30

March 2016

Hydrangea Plants

Written by , Posted in Gardening

Every Friday, Wes has been known to bring me a beautiful bouquet of flowers. This past weekend, we celebrated Easter with some beautiful Hydrangea blooms. We have two Hydrangea bushes in our outdoor garden (which usually bloom mid-summer). Since it’s too early for blooms outdoors, these indoor plants were a welcome addition to our kitchen, brightening up the space with their voluptuous shape and vibrant colour.

mar30_hopereflected_hydrangea1

The name Hydrangea comes from the Greek “Hydro“, meaning “Water“, and “Angeion“, meaning “Vase“. As you know, Hydrangea plants love their sun and they love their water. The plants have two flower arrangements: One is the mophead flower (pictured here), and the other is the lacecap flower.

pink and white hydrangea.

The Hydrangea plant was originally discovered in the 1730s by an English-American botanist, John Bartram. Bartram became King George III’s botanist and is widely known as the “Father of American Botany”.

mar30_hopereflected_hydrangea3

While white is the most common colour of Hydrangea, in some species the plant can also be pink, purple, blue, and even green. Regardless of the hue, Hydrangea blossoms remain some of my favourite. Not only is the flower itself beautiful, but these plants have healthy green leaves, which make for a lovely contrast.

mar30_hopereflected_hydrangea4


Tuesday

6

May 2014

3 Essential Perennials for Every Garden

Written by , Posted in Gardening

I’m slowly developing my green thumb, with some outdoor plants that, as my Mum puts it, are “low maintenance”. While I have to discipline myself to water on a regular basis, thus far things are looking lovely, and this Spring I’m up to the challenge of adding a few additional plants in my garden. Before I get to that however, I’d like to share three essential perennials for every garden. These are low maintenance, easy enjoyment plants that everyone should have in her (or his) garden.

A perennial is a plant that lives for more than two years. Perennials will (or should, if you plant them correctly) bloom year after year, and provide you with long-term gardening success. Long after the blooms and leaves die off for the season, the root remains and will sprout up each Spring or Summer.

Over the past couple of years, I’ve had some hearty perennials planted, which are sprouting well so far this Spring. Here are three essential perennials I’ve got growing in my gardens:

Beautiful periwinkle blue forget-me-nots in my garden. img copyright hopereflected.com

Beautiful periwinkle blue forget-me-nots in my garden. img copyright hopereflected.com

1. Forget-Me-Nots (perennial, good in part sun to full sun): Tiny little forget-me-nots are sweet, delicate flowers (mine are blue, but this perennial is available in pink and white). Forget-me-not blooms are rather short-lived (they bloom early in the season), and they spread well because of their generous seeds. [Note to fellow amateur green-thumbs: If you don’t want these blues to spread, then best plant them in a pot or collect and dispose of unwanted seeds once they drop.] Two years ago, I transplanted my forget-me-nots along the edge of my gardens, to use as complementary edging. It’s worked out well, and with each passing year they grow more and more.

My peony garden. img copyright hopereflected.com

My peony garden. img copyright hopereflected.com

Deep magenta peonies in my garden. img copyright hopereflected.com

Deep magenta peonies in my garden. img copyright hopereflected.com

Pretty pink peony. img copyright hopereflected.com

Pretty pink peony. img copyright hopereflected.com

2. Peonies (perennial, good in part sun to full sun): Peonies are perhaps the most well-loved perennials out there. I’ve yet to meet a girl who doesn’t love these resplendent blooms. Peonies can be light pinks, reds, even whites or yellows. The pretty petals in my garden are a mixture of the most feminine pink and also a rich deep magenta. The long-fingered green stems usually bloom early Summer (the pictures here I took last June). If you plan to enjoy indoors as part of a bouquet, pick early to avoid ant infestation in the blooms.

Hosta in my garden. img copyright hopereflected.com

‘Formal Attire’ hosta in my garden. img copyright hopereflected.com

Hosta and hydragnea in my garden. img copyright hopereflected.com

‘Aztec Treasure’ hosta in my garden. img copyright hopereflected.com

3. Hostas (perennial, good in shade, part sun): Hostas are hearty plants. There are more than 50 different hosta varieties, and I was fortunate enough last Spring to have a neighbour give me about ten hosta plants (of several varieties) to enjoy in my garden. Easy to grow, hostas make a lovely accent in any garden. [Cool idea: For a moveable garden, try planting a hosta plant in a container.]